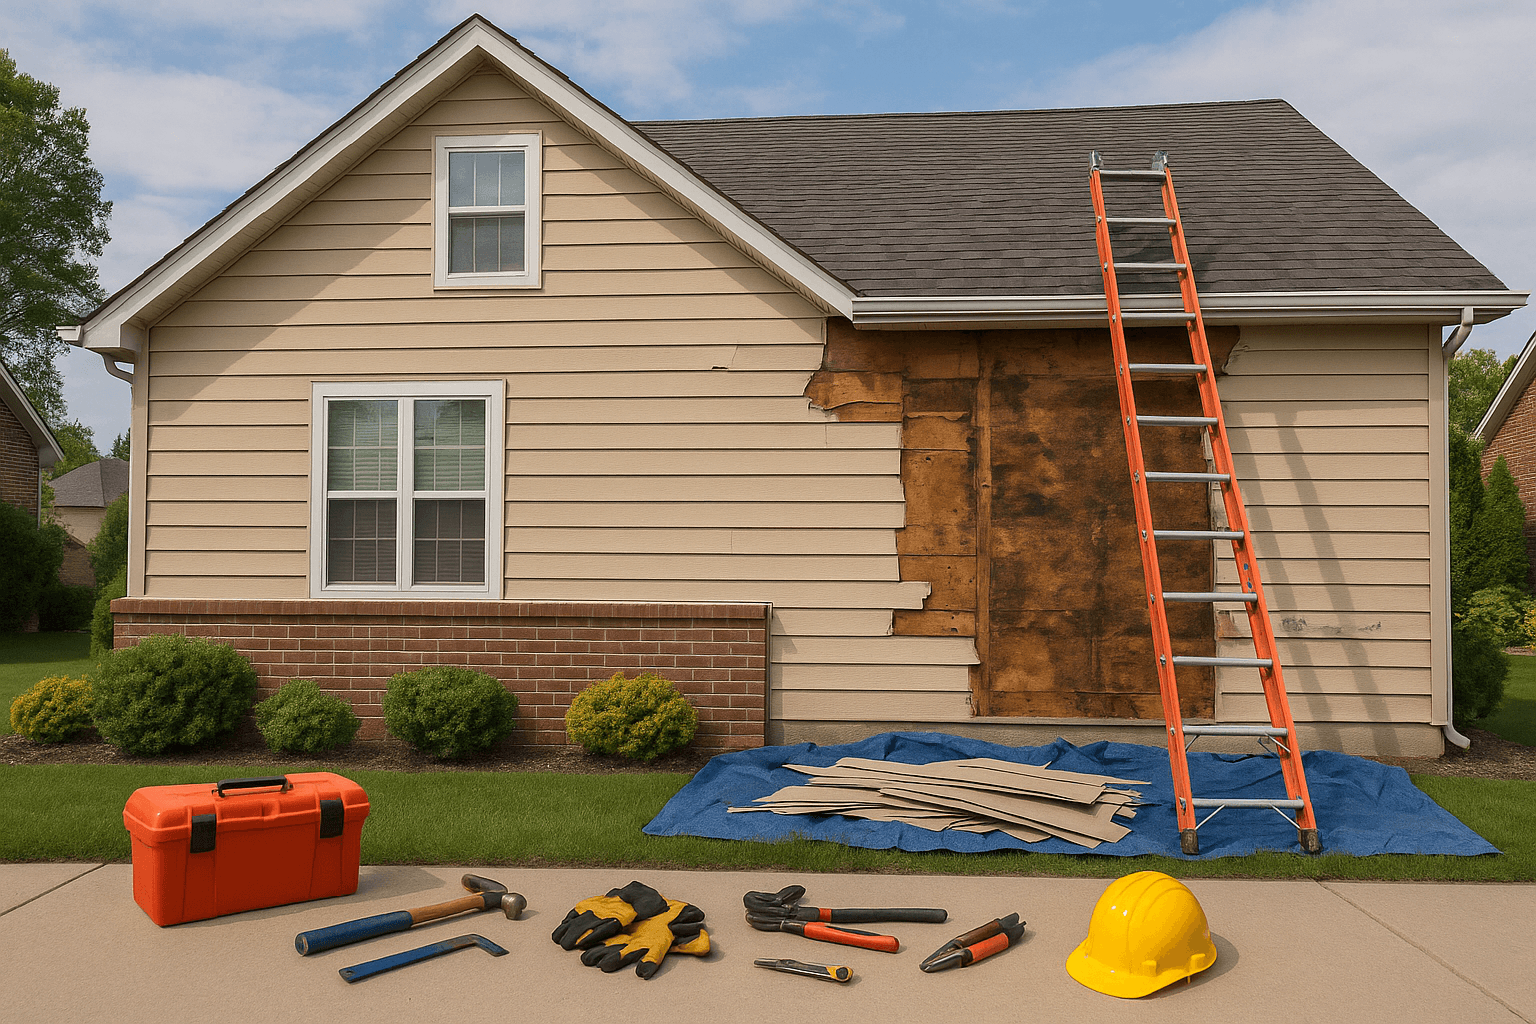
Thinking about pulling your old siding yourself? You can absolutely do it with the right kit and a clear plan. Whether you’re a homeowner restoring a bungalow in Sugar House or a business owner freshening up a storefront near 9th & 9th, taking siding off safely matters as much as putting new siding on. Here’s a practical, no-nonsense guide to the tools and safety equipment needed for DIY Siding Removal—crafted by folks who remove siding across Salt Lake City day in and day out.
Who this is for—and what you’ll get out of it
This guide is for homeowners and small-business owners around the Wasatch Front who want to handle the tear-off phase themselves. You’ll learn what gear you actually need, what’s nice to have, and how to work smart without putting your house—or yourself—at risk. If you’re after a short list of siding removal tools and a plan that fits our local weather and building styles, you’re in the right place.
We’ll talk tools, then safety, then a clean step-by-step. We’ll also add a few Salt Lake–specific notes: permits, disposal, and those windy afternoons that love to turn insulation into confetti. Sound fair?
Safety first, because the hospital is farther than your garage
You don’t need fancy gear—well, sometimes you do. The point is to protect your eyes, lungs, hands, and your balance. Old siding hides surprises, and old nails don’t care how careful you feel.
Eye and face protection
Wear ANSI-rated safety glasses at a minimum. A full-face shield is even better when you’re using a reciprocating saw or oscillating multi-tool. Chips from Wood Siding, brittle vinyl, or fiber cement can fly fast. The Stanley Wonder Bar doesn’t look dangerous, until a nail head lets go and pops a chip straight at you.
Respiratory protection
At least wear a NIOSH N95 for dust. If you’re sanding or cutting painted materials pre-1978, use a P100 respirator with proper filters and follow EPA RRP guidelines for lead-safe work. If there’s any chance of asbestos (older cement shingles, some backing materials), press pause and get it tested. Asbestos removal is not a DIY weekend project. When in doubt, call a pro.
Hands, feet, and skin
Cut-resistant gloves save knuckles from hidden nails and sharp sheet edges. Leather works, but modern cut-level gloves offer better dexterity. Wear long sleeves and pants—vinyl shards and cedar splinters don’t care it’s July. On your feet, go for sturdy footwear with puncture-resistant soles. A single stray roofing nail can ruin your whole week.
Ladders, roofs, and fall protection
Set extension ladders at about a 75-degree angle. Tie them off if you can. Stabilizers help avoid crushing gutters. On two-story work or steep grades, consider basic roof jacks and planks. If you’ll be off the ground for more than a step or two, a harness and a short lanyard are money well spent. Falls are the most common jobsite injury—don’t let a gust from Parleys Canyon make you a statistic.
Weather and air quality
Here’s the thing: along the Wasatch Front, weather changes fast. Plan around wind, heat, and winter inversions. In summer, start early; siding gets hot and brittle. In winter, watch for ice near hose bibs and shaded eaves. On inversion days, wear that respirator; your lungs will thank you.
The must-have tools for DIY siding removal
There’s a basic kit that handles most jobs cleanly. Then there are a few extra tools that make the work faster and a lot less frustrating.
Bars, blades, and the humble zip tool
Flat pry bar (like the Stanley Wonder Bar): Your everyday hero for wood or fiber cement. Slip it under boards, lift gently, then pull nails with a claw hammer or cat’s paw.
Cat’s paw nail puller: Bites nail heads that are too stubborn for a claw hammer. Yes, it can scar wood—perfectly fine during tear-off.
Vinyl Siding zip tool (Malco, C.S. Osborne): For vinyl siding removal, this is essential. It unhooks the interlock joints without cracking panels. Get two if you can; it’s easier to work both sides of a panel.
Cutting tools that don’t fight you
Utility knife with fresh blades for cutting house wrap, caulk lines, and tape. A dull blade makes jagged cuts and slips.
Oscillating multi-tool with a plunge blade: Great for cutting around light fixtures, dryer vents, or stubborn flashing without overcutting. It’s precise, which you’ll appreciate near windows.
Reciprocating saw with metal and demolition blades (Diablo, Milwaukee): Use sparingly for fastener-heavy sections or old furring strips. Keep the speed down; you’re cutting fasteners, not framing.
Fasteners: remove, collect, repeat
Impact driver or drill with nut drivers for stubborn screws. You’ll meet them in patch repairs and around fixtures.
Magnetic nail sweeper: Roll it through the yard and driveway after every session. Your tires and pets will appreciate it. So will your neighbors.
Don’t forget the “boring” helpers
Chalk line and a bright marker for layout notes.
Stud finder and a moisture meter to check sheathing conditions as panels come off. You’d be surprised how often leaks travel.
Tarps and debris bags: Use heavy-duty tarps to protect landscaping and collect debris. Short, manageable trips to the trailer beat one back-breaking haul.
Painter’s tape and zip-top bags: Label hardware from lights and vents by location. Future-you will cheer.
What you might find behind the siding
DIYers usually expect old nails. They don’t always expect what’s behind the boards. That’s where you slow down and switch from “tear-off” to “inspect-and-plan.”
Rot, pests, and mystery stains
Probe questionable areas with an awl around windows and door heads. Soft sheathing means moisture intrusion—often from missing or failed flashing. You might see ant frass (looks like sawdust), mouse droppings, or wasp nests. Suit up, clean up, and keep going with caution.
Wiring and surprises
Low-voltage lines for doorbells, cameras, or speakers are often tacked under siding. Kill power to exterior circuits before cutting near boxes. If you see sketchy splices, stop and call an electrician. It’s not worth the risk.
Weather barriers and flashing
Old felt or house wrap may be torn. Note any missing head flashing above windows and doors. You’ll want proper flashing before new siding goes on. If you’re re-siding soon, tack down torn wrap temporarily to protect the sheathing from wind and rain.
Step-by-step: a simple removal plan
Let me explain the flow we use on most Salt Lake City siding removals. It’s straightforward, and it works.
- Set your perimeter. Lay tarps, move vehicles, and mark a safe walking path. Post a simple “Work Area” note for family or staff.
- Power down. Turn off exterior circuits. Remove light fixtures and cover boxes with tape.
- Start at the top. Remove trim and accessories first—soffit channels, J-channels, corner posts—then work down. Gravity helps.
- Unhook or pry panels. Use the zip tool for vinyl. For wood or fiber cement, slide a flat bar in, lift, and back out fasteners.
- Sort debris. Keep metal fasteners separate for easier disposal. Stack panels neatly; cut long pieces if needed for transport.
- Inspect as you go. Check sheathing for soft spots, water stains, and mold. Document with your phone. You’ll want those pictures.
- Weatherproof temporarily. If re-siding isn’t same-day, re-tack house wrap and tape seams. Wind loves open walls here.
- Daily cleanup. Sweep the area, run the magnetic sweeper, and secure loose edges. A tidy site is a safer site.
When DIY is fine—and when to call a pro
Honestly, most single-story vinyl tear-offs go smoothly with patience and a decent ladder. Thick cedar, brittle hardboard, or layered siding over unknown sheathing? That’s tougher. If you find rot that spans studs, major flashing failure, or questionable structural sheathing, it’s time to bring in help.
Commercial and multifamily notes
For storefronts or multifamily buildings, plan for pedestrian protection, parking coordination, and after-hours work to limit disruptions. You might need a permit for sidewalk protection or a roll-off container in the street. Our team handles that daily; if you’re unsure, ask us to review your plan.
Budget, time, and a quick gear cost snapshot
Most of the gear can be rented or borrowed. Here’s a quick look to help set expectations for a typical one- to two-day tear-off on a single-story wall.
| Item | Buy/Rent Cost | Notes |
|---|---|---|
| Zip tool, pry bars, cat’s paw | $10–$50 each (buy) | Worth owning for future maintenance |
| Oscillating multi-tool | $79–$199 (buy) | $20/day (rent) | Precision cuts around fixtures |
| Reciprocating saw + blades | $99–$229 (buy) | $25–$35/day (rent) | Use sparingly; great for fasteners |
| Extension ladder + stabilizer | $150–$300 (buy) | $20–$30/day (rent) | Stabilizer saves gutters |
| P100 respirator + filters | $40–$80 (buy) | Go N95 at minimum for dust |
| Magnetic nail sweeper | $50–$120 (buy) | $15/day (rent) | Protects tires, pets, and bare feet |
| Roll-off dumpster | $275–$500 | Size and local fees vary |
Timewise, a careful DIYer can remove 200–400 square feet per day on a simple wall. Add time for the tricky bits: corners, around windows, and the “why is this nailed every 6 inches?” moments.
Salt Lake City specifics you’ll want to know
Permits and disposal. Tear-off alone usually doesn’t need a permit, but street dumpsters and sidewalk protection can. For disposal, check Salt Lake County Landfill guidelines; siding with lead paint or asbestos needs special handling. Please don’t mix hazardous waste in general debris.
Wind and neighbors. Afternoon gusts from the canyons will take foam and house wrap for a ride. Tape and tack edges often. A quick heads-up to neighbors about your work schedule goes a long way.
Seismic considerations. Along the Wasatch Fault, some older homes rely on specific sheathing patterns for shear strength. If you expose diagonal plank sheathing or specialized shear panels, avoid cutting or removing more than required. If anything looks engineered, snap photos and check with a professional before altering it.
HOAs and historic districts. In places like The Avenues or near Liberty Park, check neighborhood guidelines—especially if you’re exposing or altering visible trim details during removal. A quick call now saves headaches later.
Seasonal tips that actually help
Spring. Moist ground means fewer dust clouds, but watch for slick ladders in the morning.
Summer. Vinyl gets pliable in heat; remove early before noon. Hydrate, take shade breaks, and wear light sleeves to fend off sun and scrapes.
Fall. Perfect for re-wrap and prep. Shorter days—stage lights if you’ll work past dusk.
Winter. Ice at north-facing corners is sneaky. Keep salt handy for walk paths and ladder feet. If you’re re-wrapping, pick a sunny, calm day; tape sticks better.
Final checks before you re-side
Before new siding goes on, do a slow lap around the house or building. Fix sheathing soft spots. Add or repair flashing above windows, doors, and ledger connections. Tape and secure house wrap with proper shingle-style laps. Mark studs on the wrap with a sharpie; future fastening goes faster. And take pictures—future-you, or your installer, will thank you when it’s time to locate wiring and vent paths.
Common pitfalls (and easy ways around them)
Over-prying and cracking panels. Patience beats force. Work nails loose, don’t yank.
Skipping PPE “just for a minute.” That one minute tends to be the minute a chip rebounds. Keep gear on until tools are down.
Forgetting the magnet sweep. Do it daily. Your driveway will stay happy, and so will the mail carrier.
Not labeling hardware. A sandwich bag and a marker cost pennies and save hours later.
A quick word on materials: vinyl, wood, fiber cement
Vinyl. Use the zip tool to unhook the bottom edge, then lift the panel above. Work in long, even motions. Cold vinyl cracks, so be gentle below 50°F.
Wood (cedar, lap, shingles). Expect brittle edges on older boards. Score paint lines where trim meets siding to avoid tearing finish off trim you’ll keep.
Fiber cement. It’s heavy and can be dusty when cut. Avoid aggressive saw cuts during removal; pry and back out nails where possible. Wear that respirator.
Thinking ahead to new siding
Even if you’re only doing removal, take a minute to think forward. If you’re planning fiber cement or Steel Siding, check your sheathing thickness and flatness now. If you’re leaning toward insulated vinyl, make sure window trim will still have a clean reveal with added thickness. Small notes now prevent big surprises later.
Ready to make your life easier?
You can handle DIY siding removal with the right gear and a calm pace. But if you hit a wall—literally or figuratively—Utah Siding & Exteriors is here to help. We can handle the whole project or just the tricky parts, including safe tear-off, disposal, sheathing repairs, and fresh, code-compliant weatherproofing. Local crews, clean sites, done right.
Call 801-509-9241 or Request a Free Quote. Tell us what you’re working on, and we’ll give you clear, friendly advice—no pressure, just straight answers from the Utah Siding & Exteriors team you can trust.